
This blog post is designed to guide you through the mesmerizing world of home jewelry metal casting. We’ll demystify the process, covering the selection of appropriate metals, the setting up of your home casting station, and mastering the basic techniques of casting. Safety will be a central concern, ensuring you can enjoy your crafting without worry.
Moreover, we’ll explore how to bring your unique designs to life, turning them from sketches into tangible, beautiful jewelry. So, let’s embark on this journey together, and make your creative dreams a reality.
Preparing Your At-Home Casting Station
Setting up an at-home casting station for creating your own jewelry can be an exciting endeavor. While it may seem a tad complex, with the right guidance and a systematic approach, you’ll have your own mini-foundry humming in no time. Let’s take a detailed step-by-step journey into creating the perfect space for your jewelry-making adventure.
Choosing the Right Space
The first thing you’ll need to do is select an appropriate space for your casting station. It should be well-ventilated, away from flammable materials, and have a reliable power supply. Safety is paramount, so make sure it’s a place where you can work undisturbed.
Acquiring the Essentials
Next, let’s talk about the equipment. Here’s a table breaking down what you’ll need:
| Equipment | Purpose |
| Kiln or furnace | To melt the metal |
| Crucible | Holds the metal as it melts |
| Flask | Contains the mold |
| Casting grain | The metal to be melted |
| Safety gear | Protects you during the casting process |
| Precision tools | For designing and finishing the jewelry |
Most of these items can be purchased from a specialized supplier or online.
Organizing Your Tools
After acquiring all the necessary equipment, the next step is organizing your station for maximum efficiency. You should have designated areas for different steps of the process. For example, you might have one area for design and mold creation, another for the actual casting, and a separate area for finishing and polishing. This will help streamline your work and make the process smoother.
Safety Measures
As I mentioned earlier, safety should be your top priority. You’ll need to have a fire extinguisher nearby and always wear safety gear, including heat-resistant gloves, eye protection, and an apron. If you’re working with particularly high temperatures, consider investing in a face shield and a fume extraction system.
Keeping it Clean
Last but not least, remember that a clean workspace is a safe workspace. Regularly cleaning your casting station will not only make it a more pleasant place to work but also reduce the risk of accidents.
Selecting and Creating Your Jewelry Design
Before you delve into the world of metal casting, one of the most critical stages is selecting and creating your jewelry design. This is where your creativity takes flight, and your unique ideas transform into a tangible blueprint. Let’s break it down.
Brainstorm and Sketch
First off, allow your creativity to flow and brainstorm the type of jewelry piece you want to create. Is it a ring? A necklace pendant? An earring? Once you’ve decided, start sketching your design on paper. Don’t worry about perfection at this point; it’s all about getting your ideas out.
Consider the Feasibility
As you sketch, remember that not all designs are suitable for casting, especially for beginners. You need to consider the feasibility of your design in terms of its complexity, the type of metal you plan to use, and the casting techniques at your disposal. The simpler the design, the easier it will be to cast.
| Designs | Complexity |
| Simple shapes | Easy |
| Detailed shapes | Moderate |
| Complex patterns | Difficult |
Make a Prototype
Once your design is finalized, the next step is to create a prototype, usually carved from wax. This process, known as lost wax casting, involves carving the wax model, which will be used to create a mold for casting the metal.
Design Evaluation
Now that you have a physical model of your design, evaluate it for any potential issues. Does it look as you envisioned? Is it too thin or thick in certain areas? Take your time to analyze and refine the prototype until you’re satisfied.
Remember, your design is the heart of your jewelry piece. So, take your time, explore your creativity, and make a design that truly represents you. After all, that’s the beauty of creating your own jewelry – it’s a direct reflection of your unique style.
Where can you look for ideas or buy ready jeweler casting models
Finding inspiration for your jewelry designs or sourcing ready-made casting models can sometimes feel like searching for a needle in a haystack. However, with the right resources and a sprinkle of creativity, you’ll have a treasure trove of ideas in no time.
Where to Look for Inspiration:
- Nature: The natural world is an abundant source of intricate and unique designs. From the symmetry of a snowflake to the curve of a seashell, inspiration can strike anywhere.
- Art and Architecture: The patterns found in various art forms and architectural styles can translate beautifully into jewelry designs. Consider browsing art books or visiting local landmarks.
- Online Platforms: Websites like Pinterest, Instagram, and design-focused blogs are rich in creative ideas. You can create a collection or ‘mood board’ of designs that appeal to you.

Where to Buy Ready-Made Casting Models:
If you’re more inclined to use ready-made casting models, there are several places to explore:
- Specialized Online Stores: Websites such as Rio Grande and Etsy offer a wide variety of pre-made wax models that are ready to be cast.
- Local Craft Stores: Some craft stores carry ready-made wax models. It’s worth calling ahead to check their inventory.
- Jewelry Supply Stores: These often carry a selection of wax models alongside other jewelry-making supplies.

Gold, Silver, or Platinum? Choosing Your Metal
Choosing the right metal for your jewelry piece is just as important as crafting the design itself. The metal you choose can influence the durability, look, and even the cost of your jewelry. Today, we’ll delve into three popular choices: gold, silver, and platinum.
| Metal | Durability | Price |
| Gold | Moderate | High |
| Silver | Good | Moderate |
| Platinum | High | Highest |
Gold
Gold is a timeless classic in the world of jewelry. Known for its warm hue and inherent glamour, gold is often associated with luxury and style. It’s a soft metal, making it easier to work with for intricate designs. However, pure gold (24 karats) is usually too soft for jewelry, so it’s often alloyed with other metals to increase its durability. These alloys can also change the color of gold, leading to varieties like white and rose gold.
Silver
Silver, specifically sterling silver, is another popular choice. It’s more affordable than gold and platinum, and it offers a stunningly bright and cool aesthetic. It’s slightly harder than gold, making it a good choice for pieces that will see daily wear. However, silver can tarnish over time, so it does require some maintenance to keep its sparkle.
Platinum
Platinum is the heavyweight champion in the world of precious metals. It’s denser and more durable than gold or silver, making it a great choice for jewelry that’s meant to last a lifetime. Its naturally white sheen won’t fade or change color over time. However, this strength and durability come with a higher price tag.
Mastering Mold Making: A Step-by-Step Guide
After choosing a design and metal, the next critical step in jewelry casting is creating the mold. The process might seem daunting, but don’t worry – with a little patience and practice, you’ll master it in no time.
| Steps | Tools Needed |
| Create a Wax Model | Jeweler’s Wax, Precision Knife |
| Sprue Your Model | Wax Rod |
| Invest the Model | Investment Powder, Cylinder |
| Burnout | Kiln |
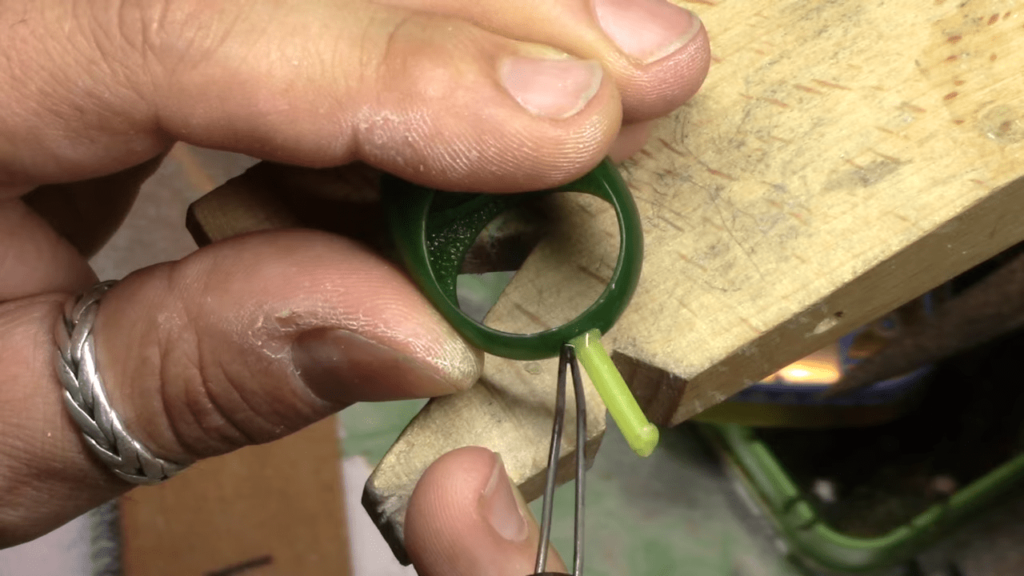
1. Create a Wax Model: First, carve your design into a block of jeweler’s wax. Use a precision knife and other tools to make the model as detailed as you’d like. If you’re using a ready-made wax model, you can skip this step.
2. Sprue Your Model: Attach a wax rod, known as a sprue, to your wax model. This sprue will eventually create the channel through which the molten metal will flow into your design.
3. Invest the Model: Now, prepare the investment, a type of plaster that will hold your model while it’s being cast. Mix the investment powder with water according to the manufacturer’s instructions, then pour it into a cylinder (like a PVC pipe). After this, insert your sprued model into the investment, making sure it’s fully covered. Let it sit until the investment hardens.

4. Burnout: This is where the “lost wax” casting gets its name. Place the investment cylinder in a kiln and raise the temperature slowly. The wax model will melt and evaporate, leaving behind a hollow mold in the hardened investment.

The Intricacies of Mold Creation: Detailing Your Design
1. Understand Your Design: Before you start carving, take the time to fully understand your design. This means looking at the smallest intricacies – the curves, the lines, and the elements that make it unique. Sketch your design from multiple angles, and consider how it will look when cast in metal.
2. Use the Right Tools: Jewelers’ wax is quite versatile and can be carved with a variety of tools. Precision knives, files, Dremel tools, and wax carving tips can all help to add details to your model. Choose the right tool for the job based on the specific details you’re trying to achieve.
3. Practice Patience: Detailing a wax model is not a task to be rushed. Work slowly and carefully, constantly checking your progress against your design. Remember, it’s easier to remove more wax later than to put it back once it’s gone.
4. Experiment with Texture: Don’t limit your detailing to just the shape of your design. Textures can add a new level of interest to your jewelry. From smooth and polished to rough and organic, the options are only limited by your imagination.
Safety First: Guidelines for Metal Casting at Home
While the process of jewelry casting at home is a rewarding and creative experience, it’s crucial to remember that working with hot metals and equipment comes with potential hazards. Therefore, observing safety measures should be an integral part of your casting journey.
1. Protective Clothing: Always wear heat-resistant gloves when handling hot metals or equipment. Use safety goggles to protect your eyes from potential splashes of molten metal or flying debris. Wear an apron to protect your clothes and skin, and consider closed-toe shoes to safeguard your feet.
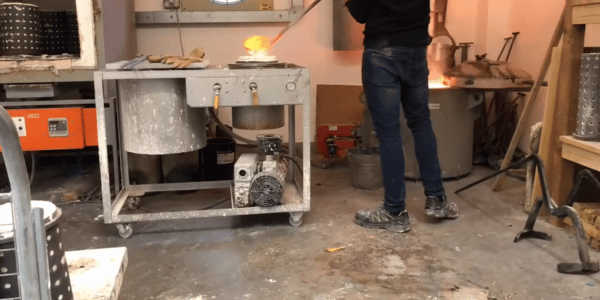
2. Ventilation: Adequate ventilation is essential when casting. Fumes from molten metals can be harmful if inhaled in large quantities. Make sure your casting area is well-ventilated, or better yet, work in an open-air environment if possible.
3. Fire Safety: As you’ll be working with high temperatures, it’s vital to have fire safety measures in place. Have a fire extinguisher at hand and make sure you know how to use it. Avoid flammable materials near your casting station.
4. Equipment Maintenance: Regularly check your equipment for any signs of wear and tear. Damaged equipment can be a safety hazard. Also, remember to cool your tools properly after use to prevent accidental burns.
The Finishing Line: Cleaning and Polishing Your Jewelry Creation
After casting your jewelry, you’re not quite done yet. Now comes the exciting final phase – cleaning and polishing your creation. This is where your piece truly starts to shine, reflecting all the careful work you’ve put into it.
| Finishing Steps | Tools Needed |
| Removing the Investment | Safety Goggles, Chisel or Hammer |
| Cut Off the Sprue | Jeweler’s Saw |
| Cleaning the Piece | Cleaning Solution, Soft Brush or Ultrasonic Cleaner |
| Polishing | Polishing Wheel, Polishing Compounds |
1. Removing the Investment: After the metal has cooled, your first step will be to remove the hardened investment. This can typically be done by gently breaking it away from the metal, but be careful not to damage your design in the process.
2. Cut Off the Sprue: The sprue, or the channel where the molten metal was poured, should be carefully cut away using a jeweler’s saw. Remember to save your scrap metal, as it can be re-melted and reused in future projects.
3. Cleaning the Piece: Use a mild cleaning solution and a soft brush to remove any remaining investment or debris. For intricate designs, consider using an ultrasonic cleaner to get into those hard-to-reach areas.
4. Polishing: Now it’s time to bring out the shine! Start with a coarse polishing compound and a polishing wheel, gradually moving to finer compounds. Be careful not to remove too much material, especially on detailed areas.
What are some common mistakes to avoid when casting jewelry at home
Casting jewelry at home is a rewarding but complex process, and beginners can often make mistakes. Here are some common ones to avoid:
1. Rushing the Process: Each step in the casting process – from design and mold making to metal preparation and final polishing – requires time and patience. Rushing through any step can lead to a poor-quality final product. Patience truly is key in jewelry casting!
2. Not Ventilating Properly: The casting process can produce harmful fumes, especially when melting metals. Always ensure you’re working in a well-ventilated area, or better yet, outside if possible, to avoid inhaling these fumes.
3. Not Wearing Proper Safety Gear: Safety should always be your top priority. Neglecting to wear heat-resistant gloves, protective eyewear, and appropriate clothing can lead to serious injuries.
4. Using Wrong or Poor-Quality Materials: The quality of your finished piece depends heavily on the materials you use. Using the wrong type of metal, low-quality casting investment, or an unsuitable wax model can all negatively affect your final piece.
5. Overheating the Metal: Each type of metal requires a specific temperature for casting. Overheating can cause the metal to become too fluid, which can lead to defects in your casting or even damage your mold.
Frequently Asked Questions
1. What types of metals can I use for casting jewelry at home?
You can use a variety of metals for home jewelry casting, including gold, silver, bronze, and brass. It’s important to remember each metal has specific melting points and handling characteristics.
2. Is it safe to cast jewelry at home?
Yes, it’s safe if you follow all the necessary precautions. Always work in a well-ventilated area, wear protective clothing and safety gear, and ensure your casting station is well-organized to prevent accidents.
3. Can I reuse the metal from a failed casting?
Yes, scrap metal can usually be melted down and reused. Make sure the metal is clean before reusing to avoid introducing impurities.
4. What equipment do I need to start casting jewelry at home?
At a minimum, you’ll need a heat source for melting the metal, crucibles, safety equipment, casting investment, wax for making the model, and tools for finishing and polishing your piece.
5. I’m not artistic. Can I still make beautiful jewelry?
Absolutely! There are numerous ready-made molds and models available that can help you create beautiful pieces. Plus, jewelry making is a skill that improves with practice, so don’t be discouraged if your first few attempts aren’t perfect.
Conclusion
In conclusion, casting jewelry at home is a rewarding craft that combines creativity, attention to detail, and patience. With the right tools, materials, and safety measures, you can create intricate designs from the comfort of your home.


Leave a Reply