So, you’ve decided to dive into the world of jewelry making. An exciting choice! Perhaps you’re dazzled by the array of intricate jewelry designs you’ve seen and have decided to try your hand at creating your own. If so, you’re in the right place. Welcome to the fascinating world of jewelry metal casting!
Jewelry casting, a cornerstone of the craft, can be complex, but with this beginner-friendly guide, we’ll unravel the secrets of this age-old process. We’ll explore what metal casting is, why it’s crucial in jewelry making, and most importantly, how you can get started. Buckle up and let’s get this journey started!
What is Jewelry Metal Casting?
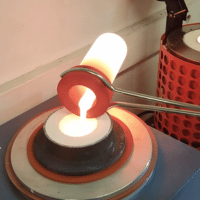
Jewelry casting, or metal casting, is a process where liquid metal is poured into a mold to create jewelry pieces. Think of it as baking; instead of pouring batter into a cake tin, you pour molten metal into a cast, and voila! You have a unique piece of jewelry.
The beauty of this process lies in its flexibility. Whether it’s intricate rings, elegant pendants, or statement bracelets, casting allows you to bring any design to life.
Why Choose Casting?
You might be wondering, “Why not just carve jewelry out of a block of metal?” Excellent question! And the answer lies in the versatility and efficiency of casting.
Casting gives you the freedom to reproduce your favorite designs multiple times. It allows you to create intricate pieces that would be near impossible to achieve by simple carving. Plus, there’s the added benefit of reduced waste. Unlike carving, which often results in excessive metal shavings, casting allows you to use just the right amount of metal for your piece.
Getting Started with Jewelry Casting
You’re now familiar with the ‘what’ and ‘why’ of jewelry casting. Now, let’s delve into the ‘how’. Below, we’ll outline some crucial steps to help you kickstart your journey in jewelry metal casting.
Step 1: Gather Your Materials
Like any craft, jewelry casting calls for certain tools. You’ll need a furnace or torch for melting the metal, casting grains of your preferred metal (like gold, silver, or bronze), a crucible to hold the molten metal, and casting flasks to contain the mold.
You’ll also need investment powder, which, when mixed with water, creates the mold. Safety equipment such as heat-resistant gloves, apron, and safety glasses are a must. Lastly, to shape your final product, you’ll need jewelry files, a saw frame, and saw blades.
Step 2: Create Your Model
Next, you’ll need to create a model of your jewelry piece. You can make this model out of wax. The model should be an exact replica of the jewelry piece you want to cast.
Step 3: Make the Mold
Once your model is ready, it’s time to create the mold. This process involves investing, where you place the model in a flask and pour in the investment powder mix. As it dries, the investment powder forms a mold around your model.
Step 4: Burnout and Casting
Next up is the burnout process. Here, you’ll place the flask in a kiln to eliminate the model, leaving behind a hollow mold. You’ll then pour molten metal into this mold to create your jewelry piece.
Step 5: Finishing Up
After the metal has cooled and solidified, it’s time for the big reveal. You’ll submerge the flask in water to dissolve the investment powder, and voila! Your cast piece emerges. All that’s left is to clean it up, file away any rough edges, and polish it to your desired finish.


Leave a Reply